This is Part 3 of the “Frontend Testing, Done Right” series. Browse the full series · Glossary
This is a start-to-finish walkthrough of wiring a testing environment into a React + Vite + TypeScript project — from an empty folder to the first passing test. We install Vitest, Testing Library, and jsdom, read the config line by line, turn the first test green, and map out where setup most often goes wrong. One article, complete setup.
If you’ve been following the series: chapter 0 covered the why and the what, and now we enter chapter 1 — the building part. From this installment on, we layer tests onto one demo app (a small dashboard that searches users). Landed here from a search? You’re in the right place too — we start from an empty project anyway, so just follow along. Today’s goal is simple: turn on the first green light.
Practice code: this installment’s exact state lives in the
step-03tag. Clone the repo andgit checkout step-03to follow along. Curious about the finished app? Seemain.
What we cover this time#
- Installing and configuring Vitest, Testing Library, and jsdom
- Running your first test with
npm test - The spots where setup most often goes wrong
What you need: Node.js 18 or later, a terminal, and a code editor (VS Code or similar). If
node -vprints a version in your terminal, you’re ready.
Project and tools#
We start from Vite’s React + TypeScript template. The first command scaffolds the project; the second line steps into the folder and installs the base dependencies.
npm create vite@latest frontend-testing-lab -- --template react-ts
cd frontend-testing-lab && npm install
Now the testing tools. The -D flag marks these as “development-only packages” — they never ship with your app code.
npm i -D vitest @vitest/coverage-v8 jsdom \
  @testing-library/react @testing-library/jest-dom @testing-library/user-event
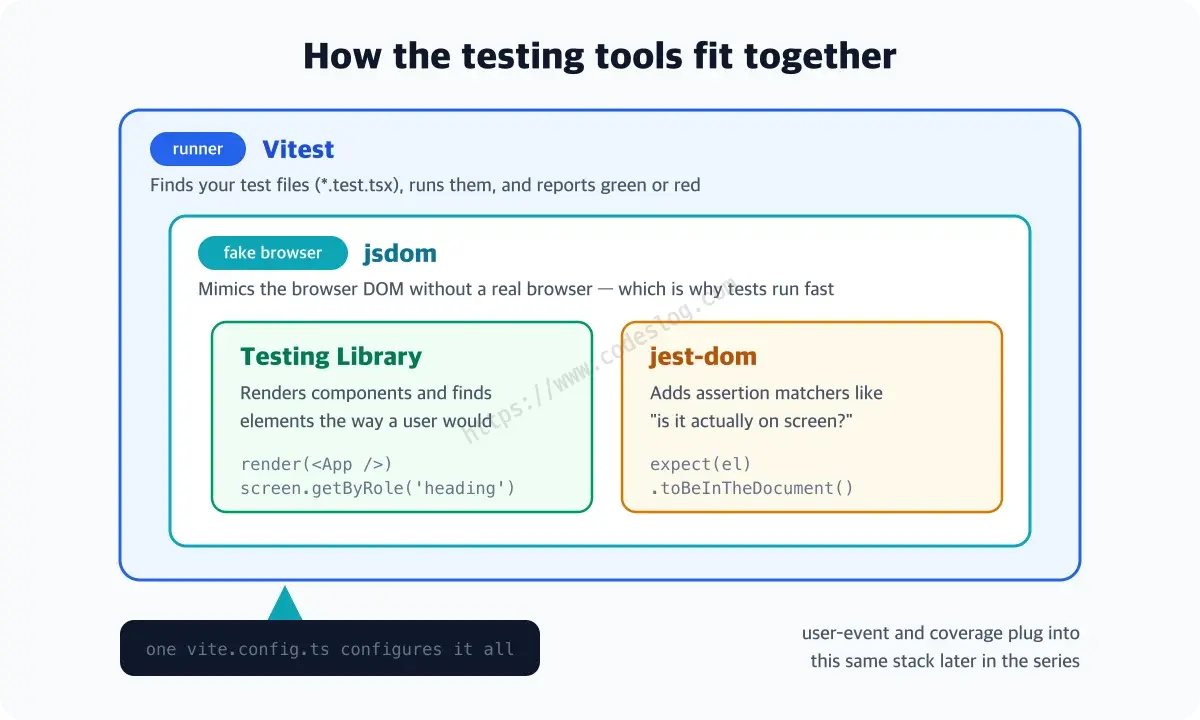
Six packages at once looks intimidating, but each one has exactly one job, which makes it simpler than it seems.
| Package | What it does |
|---|---|
vitest | The runner that finds tests, executes them, and reports back — today’s protagonist |
jsdom | A fake browser that mimics the DOM inside Node |
@testing-library/react | Renders components (render) and finds elements on screen (screen) |
@testing-library/jest-dom | A set of screen-assertion matchers like toBeInTheDocument |
@testing-library/user-event | Simulates clicks and typing (takes the stage later) |
@vitest/coverage-v8 | Generates coverage reports (we’ll use it later) |
Here’s how the four core tools fit together.
Why Vitest instead of Jest? In a Vite project, Vitest is the natural choice: it reuses your app’s Vite config as-is, its API is almost fully Jest-compatible, and it’s fast.
The config#
App and test configuration live together in one vite.config.ts. (This is the demo repo’s actual config.) It looks like a lot of options at first, but the only two lines you need to understand right now are the commented ones — environment and globals.
/// <reference types="vitest/config" />
import { defineConfig } from 'vite'
import react from '@vitejs/plugin-react'

export default defineConfig({
  plugins: [react()],
  test: {
    environment: 'jsdom',          // mimic the browser DOM
    globals: true,                 // use it/expect without imports
    setupFiles: './src/test/setup.ts',
    css: false,
    exclude: ['e2e/**', 'node_modules/**', 'dist/**'], // E2E belongs to Playwright
    coverage: { provider: 'v8', reporter: ['text', 'html'] },
  },
})
The setup file named in setupFiles is preparation code that runs once before every test file. For now it’s a single line registering the jest-dom matchers (the screen-assertion comparators). (MSW setup lands here later.)
// src/test/setup.ts
import '@testing-library/jest-dom/vitest'
Tidy up the package.json scripts too.
"scripts": {
  "test": "vitest run",
  "test:watch": "vitest",
  "coverage": "vitest run --coverage",
  "typecheck": "tsc -p tsconfig.test.json --noEmit"
}
vitest run executes once and exits; vitest (without run) is watch mode. Leave watch mode on and every file save re-runs the affected tests automatically — change code, save, check the green light. That rhythm is the fastest way to get comfortable with testing, so I recommend keeping npm run test:watch running while you develop. (The tsconfig.test.json in the typecheck script doesn’t exist yet — we’ll cover why you want it in “Where setup goes wrong” just below.)
The first test#
One thing before we write it — replace the default App.tsx that the Vite template generated (the one with the spinning logo) with our demo app’s starting point. Skip this and the test below goes red, so don’t.
// src/App.tsx — this is plenty for today
export default function App() {
  return (
    <main>
      <h1>대시보드</h1>
      <p>프론트엔드 테스트 연습용 데모 앱입니다.</p>
    </main>
  )
}
(The demo app’s UI text is in Korean — 대시보드 means “Dashboard”. The repo’s App also contains a user-search component, but we’ll build that together later. Today, a heading is all we need.)
Now the simplest possible test, just to confirm the pipeline runs. The file is src/App.test.tsx — right next to the file it tests, with .test.tsx at the end of the name. Vitest finds and runs files matching that pattern automatically.
import { it, expect } from 'vitest'
import { render, screen } from '@testing-library/react'
import App from './App'

it('shows the app title', async () => {
  render(<App />)

  expect(screen.getByRole('heading', { level: 1, name: '대시보드' })).toBeInTheDocument()
})
(In the companion repo the test description is written in Korean — same test, different sentence.) Let’s unpack the new syntax one piece at a time.
it('description', fn)— defines one test. The first argument shows up verbatim in the failure report, so describe what you’re checking in plain language.render(<App />)— actually draws the component into the fake browser (jsdom).screen.getByRole(...)— finds an element on the rendered screen. Here we asked for “a level-1 heading whose name is 대시보드.”expect(value).matcher()— the declaration that “this value should be like this.” The comparison method after the dot, liketoBeInTheDocument, is called a matcher.
Define with it, declare with expect — these two sentences are our basic grammar for the rest of the series.
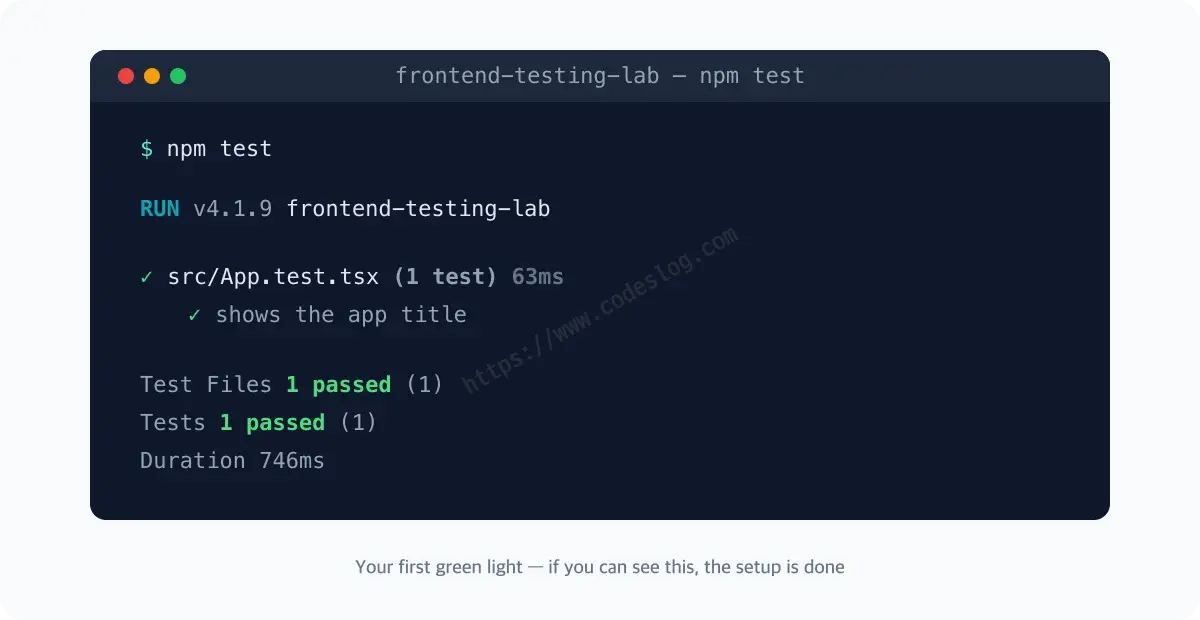
npm test
#  ✓ src/App.test.tsx (1 test)
#
#  Test Files  1 passed (1)
#       Tests  1 passed (1)
A green check means you made it. If it’s red — don’t panic, read the first line of the error. It’s almost certainly one of the items just below.
Where setup goes wrong#
document is not defined→ missingenvironment: 'jsdom'- Type error saying
toBeInTheDocumentdoesn’t exist → missing@testing-library/jest-dom/vitestimport in the setup file - Vitest picks up E2E files too →
exclude: ['e2e/**'] - The build (tsc) type-checks test files → add
src/**/*.test.tsxande2etoexcludeintsconfig.app.json - Then who catches type errors in the test files? → Good question. We just excluded them from the build, so left alone: nobody. Create a test-only
tsconfig.test.jsonand add the"typecheck": "tsc -p tsconfig.test.json --noEmit"script. The moment we added this to the demo repo, it surfaced two hidden type issues. It’s a one-liner in CI, too.
If the last two items (splitting tsconfigs) feel heavy right now, that’s normal. You don’t need to fully get them today — they don’t affect your first green light, and when you actually hit the problem, come back to this list. The demo repo has it all configured for comparison.
Accessibility just made its first appearance.
getByRole('heading', ...)verifies “did the heading render” and “does a screen reader recognize it as a heading” at the same time. We’ll dig into this properly later in the series.
The one-page recap#
- Install in two lines: scaffold the Vite React-TS template +
npm i -D vitest jsdom @testing-library/react @testing-library/jest-dom @testing-library/user-event @vitest/coverage-v8— six packages, one job each - All config lives in one
vite.config.ts: the two lines that matter today areenvironment: 'jsdom'(the fake browser) andglobals: true - The setup file in
setupFilesneeds just one line registering jest-dom — that unlocks the screen-assertion matchers - Test files sit next to what they test, named
*.test.tsx— define withit('description', ...), declare withexpect(value).matcher() - Red light? Read the first line of the error and check it against “Where setup goes wrong” above
The first green light is on#
The environment is ready. Starting next time, we build real unit-testing muscle.
The dopamine hit when the first green light turns on is real. One line of PASS ✓ — that’s what all this suffering… I mean, all this fun, is for.
Level up: you can now set up a testing environment from scratch and turn on the first green light.
Next up: Unit testing basics — pure functions, edge cases, and the AAA pattern
Bumped into an unfamiliar term? The glossary has them all, one line each.
Leave a comment