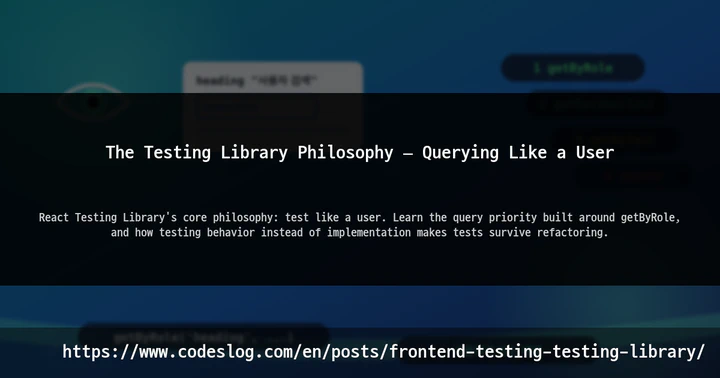
This is Part 7 of the “Frontend Testing, Done Right” series. Browse the full series · Glossary
Testing Library is the de facto standard for component testing in React and beyond. But the real substance of this tool isn’t its API — it’s one philosophy. The moment you start testing components, temptations appear: “should I find it by class name? peek at internal state?” Testing Library answers firmly: do what the user does. In this article we’ll see what that philosophy means, the order for choosing queries, and why this approach is inseparable from accessibility — all while building a search component from scratch.
If you’ve been following the series — you’re carrying the function-level fundamentals from Chapter 1 (AAA, async, test doubles) into Chapter 2: actual screens. Landed here from a search? No problem. The example component is built from zero in this article, and the single utility it uses comes from the unit testing part. (The examples are React, but the query philosophy is identical in Testing Library for Vue and Svelte.)
Practice code: this installment’s exact state lives in the
step-07tag.git checkout step-07to follow along, diff it against step-06 to see just what this part added, or open it in StackBlitz with one click.
What we’ll cover#
- What “test behavior, not implementation” actually means
- Query priority — why getByRole comes first
- The getBy / queryBy / findBy trio
- Why this philosophy and accessibility are one and the same
At last, we build a screen#
Time to build the first version of the user search component we promised in the setup part. (Vitest and Testing Library installation and configuration live in that part too — if you’re new here, just borrow the setup.) No server calls yet — that comes later in this chapter — we start by searching a fixed list. src/components/UserSearch.tsx:
import { useState } from 'react'
import { filterByQuery, type User } from '../lib/users'

const initialUsers: User[] = [
  { id: '1', name: 'Alice Kim', email: '[email protected]' },
  { id: '2', name: 'Bob Lee', email: '[email protected]' },
  { id: '3', name: 'Carol Park', email: '[email protected]' },
]

export function UserSearch() {
  const [query, setQuery] = useState('')
  const visible = filterByQuery(initialUsers, query)

  return (
    <section aria-labelledby="search-heading">
      <h2 id="search-heading">사용자 검색</h2>
      <label htmlFor="q">검색</label>{' '}
      <input
        id="q"
        type="search"
        value={query}
        onChange={(e) => setQuery(e.target.value)}
        placeholder="이름 또는 이메일"
      />
      {visible.length === 0 ? (
        <p>검색 결과가 없습니다.</p>
      ) : (
        <ul>
          {visible.map((u) => (
            <li key={u.id}>
              {u.name} <small>{u.email}</small>
            </li>
          ))}
        </ul>
      )}
    </section>
  )
}
(The UI strings are Korean — the demo app’s language. “사용자 검색” is the “User Search” heading, “검색” the “Search” label, and “검색 결과가 없습니다.” the “no results” message. Keep that mapping and every test below reads naturally.)
The filterByQuery we built in the unit testing part finally makes its on-screen debut. And look closely at the markup — the label is wired to the input via htmlFor, the section is tied to its heading with aria-labelledby, and the input is type="search". We just wrote “good HTML,” and in a moment that becomes a weapon in our tests.
Add <UserSearch /> inside the <main> of App.tsx and we’re ready.
Users see roles#
How does a user perceive this screen? “Under a heading that says User Search there’s an input labeled Search, and a list below.” — no class names, no useState anywhere. Testing Library’s queries translate exactly that perception into code.
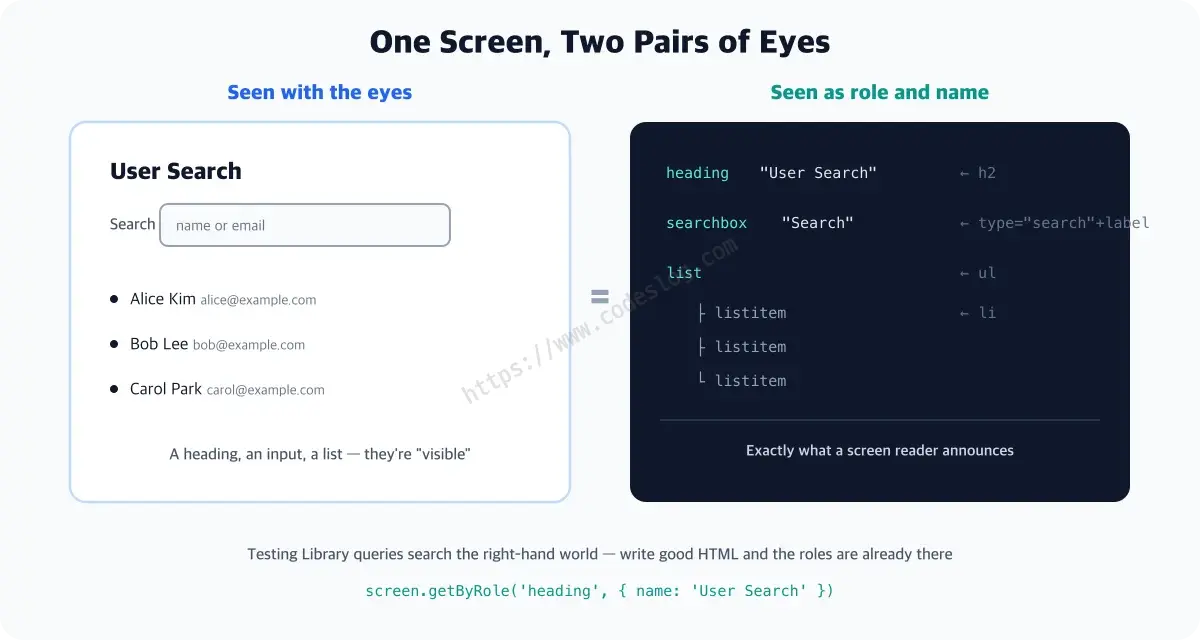
screen.getByRole('heading', { name: '사용자 검색' })  // "there's a heading"
screen.getByLabelText('검색')                         // "an input labeled Search"
screen.getByRole('searchbox')                         // the role granted by type="search"
A role is an element’s meaning (heading, button, searchbox, list); a name is what that element is called. Both are exactly the information a screen reader announces to its user. And you don’t attach this information by hand — it emerges from the HTML itself: an <h2> is a heading, a type="search" input is a searchbox, an <li> is a listitem. If you wrote good HTML, the roles are already there.
Let’s write our first component test with these eyes. Two new tools to meet first — render actually draws the component onto a fake browser screen for tests (jsdom), and screen is the counter where you look things up on that screen. src/components/UserSearch.test.tsx:
import { describe, it, expect } from 'vitest'
import { render, screen } from '@testing-library/react'
import { UserSearch } from './UserSearch'

describe('UserSearch', () => {
  it('shows the heading, search box, and full list', () => {
    render(<UserSearch />)

    expect(screen.getByRole('heading', { name: '사용자 검색' })).toBeInTheDocument()
    expect(screen.getByRole('searchbox', { name: '검색' })).toBeInTheDocument()
    expect(screen.getAllByRole('listitem')).toHaveLength(3)
  })
})
getAllByRole is the plural of getByRole — it returns elements that come in multiples, like list items, as an array. toBeInTheDocument() is a matcher that verifies “this exists on screen” in plain words, provided by the jest-dom package we installed in the setup part. All three assertions ask only “what is visible on screen.” How many useStates there are is none of the test’s business.
Query priority — pick from the top#
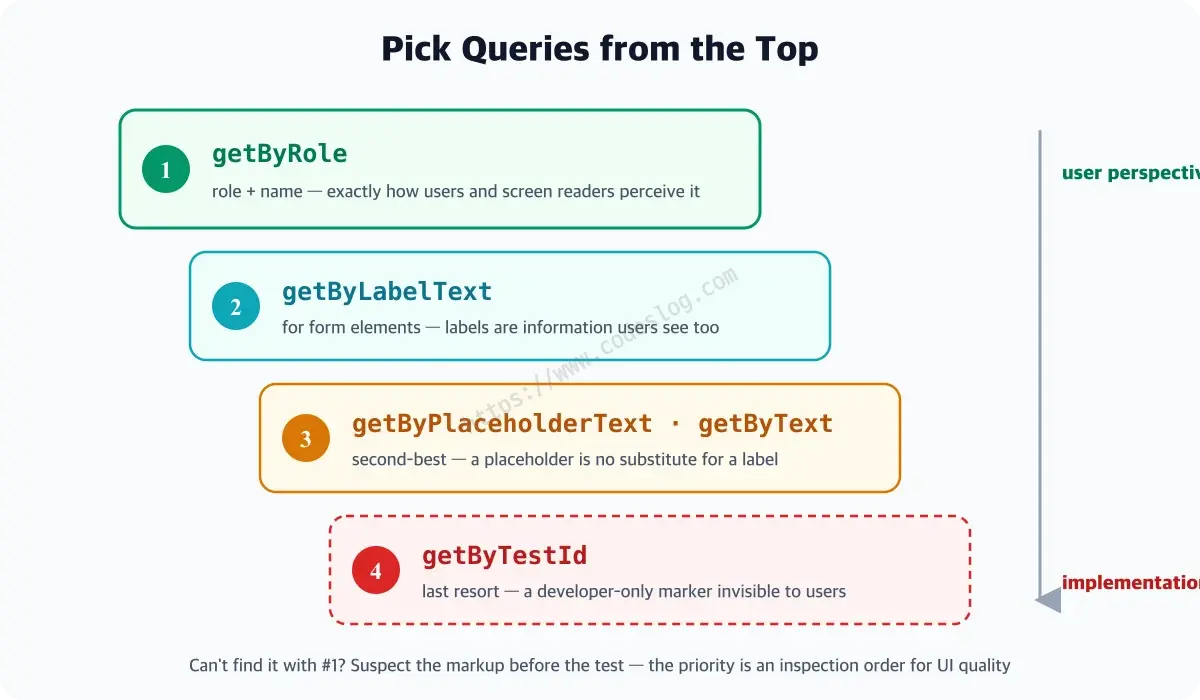
When there are several ways to find an element, Testing Library recommends this order. The higher you go, the closer to how users actually perceive the screen.
getByRole— role + name. Almost everything can be found this way, and should be findable this waygetByLabelText— for form elements. Labels are information users see toogetByPlaceholderText/getByText— second-best. A placeholder is no substitute for a label, but you’ll meet them in the wildgetByTestId— last resort. A developer-only marker invisible to users
Why this order? Because an element you can’t find with #1 usually has a markup problem. If it’s a button whose role isn’t button (div onClick…), users were inconvenienced long before your test was. Query priority isn’t a convenience ranking — it’s an inspection order for the quality of your UI.
getBy / queryBy / findBy — the situation trio#
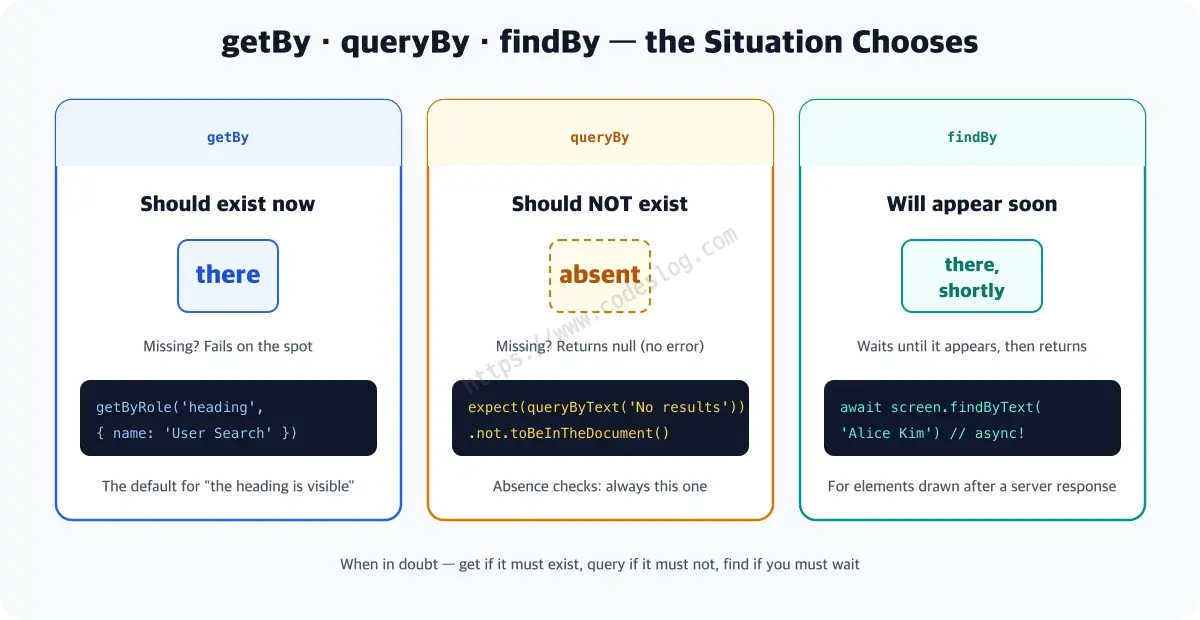
The prefixes also split three ways by situation. They pair nicely with the boundary questions from the unit testing part (“what if it’s empty? missing?”).
getBy— should exist now → missing means instant failurequeryBy— should not exist → missing returns null (not an error). For absence checks like “the no-results message is gone”findBy— will appear soon → waits until it shows up. For elements drawn after a server response (it stars in upcoming parts)
expect(screen.queryByText('검색 결과가 없습니다.')).not.toBeInTheDocument()Use getBy to verify absence and the test explodes the moment the element isn’t found. Absence checks are always queryBy — this comes up on exams. (Really. In job interviews.)
Don’t test the implementation#
You should see the other side of this philosophy too. If a test depends on “useState is called twice” or on internal function names — the moment you refactor UserSearch to useReducer, behavior stays identical and the tests collapse anyway. It’s the ‘implementation-in-amber’ trap from the test strategy part, replaying itself on components.
Verify only what we did today — “the heading shows, the search box exists, the list has three items” — and you can gut the internals without the tests batting an eye. Tests that survive refactoring are good tests. One criterion: if a user would notice the change, the test should notice; if a user wouldn’t, the test shouldn’t.
Break it on purpose#
This installment’s break is special. Delete htmlFor="q" in UserSearch.tsx.
<label>검색</label> {/* htmlFor deleted! */}The screen looks perfectly fine. Label and input are both right where they were. But the test goes red.
 × UserSearch › shows the heading, search box, and full list
   TestingLibraryElementError: Unable to find an accessible element
   with the role "searchbox" and name "검색"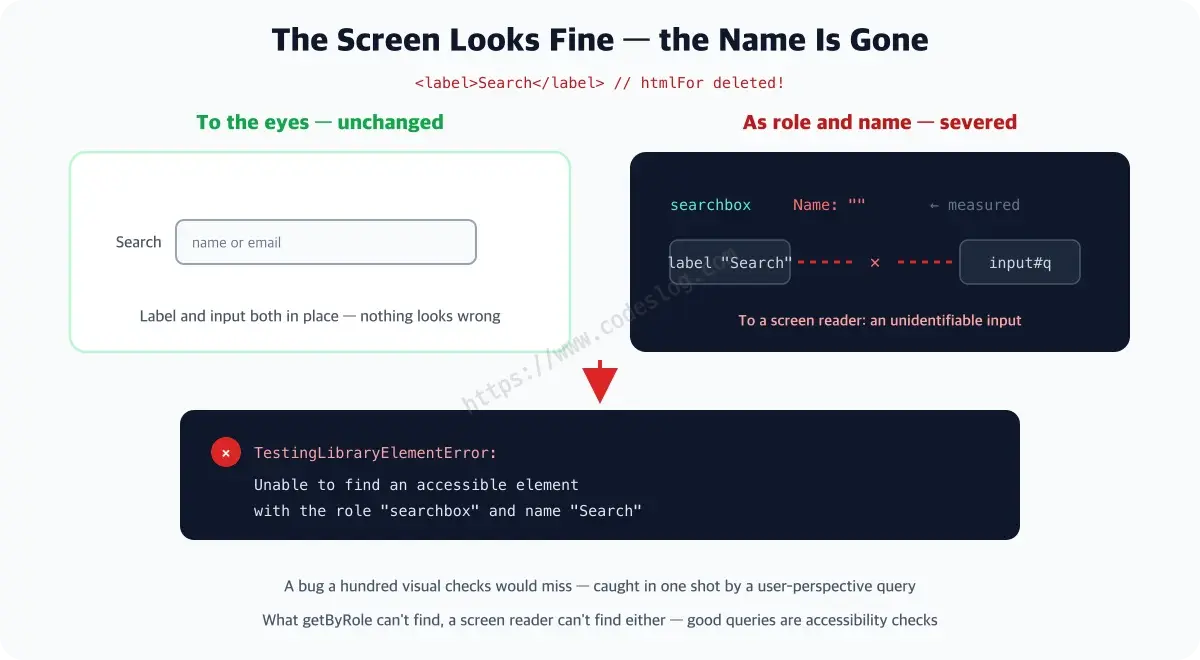
The instant the connection broke, the input lost its name. To a screen reader user it became an unidentifiable input box. A problem your eyes could stare at a hundred times and never catch — caught in one shot by a user-perspective query. Restore htmlFor and it’s green again.
This is the philosophy’s bonus. An element
getByRolecan’t find is an element a screen reader can’t find. Writing good tests catches accessibility regressions for free. We’ll dig into this properly a little later in the series.
One-page summary#
- Testing Library’s philosophy = do what the user does — verify visible behavior, not implementation (classes, state)
- Queries from the top: getByRole > getByLabelText > getByText > getByTestId (last resort) — the priority is an inspection order for UI quality, not convenience
- Can’t find it with #1? Suspect the markup first (users were inconvenienced before you were)
- The trio:
getByif it must exist,queryByif it must not,findByif it appears later - What getByRole can’t find, a screen reader can’t find — good queries are accessibility checks
Through the user’s eyes#
You now have the component tester’s eye: seeing the screen not as a warehouse of implementation but as the user’s stage. Next time we actually move on this stage — typing, clearing, watching results change: interaction testing.
Save getByTestId for genuine last resorts. Overuse it and you’re testing “like a developer” instead of “like a user,” and those tests stop telling you anything about the quality of the screen. (Sometimes you need it. Only sometimes.)
Level up: you can query components from the user’s perspective instead of the implementation’s.
Next up: forms, interaction, and state — with user-event
Bumped into an unfamiliar term? The glossary has them all, one line each.
Leave a comment